
SM series Electric Door Control System instruction manual
manual for electric door control system
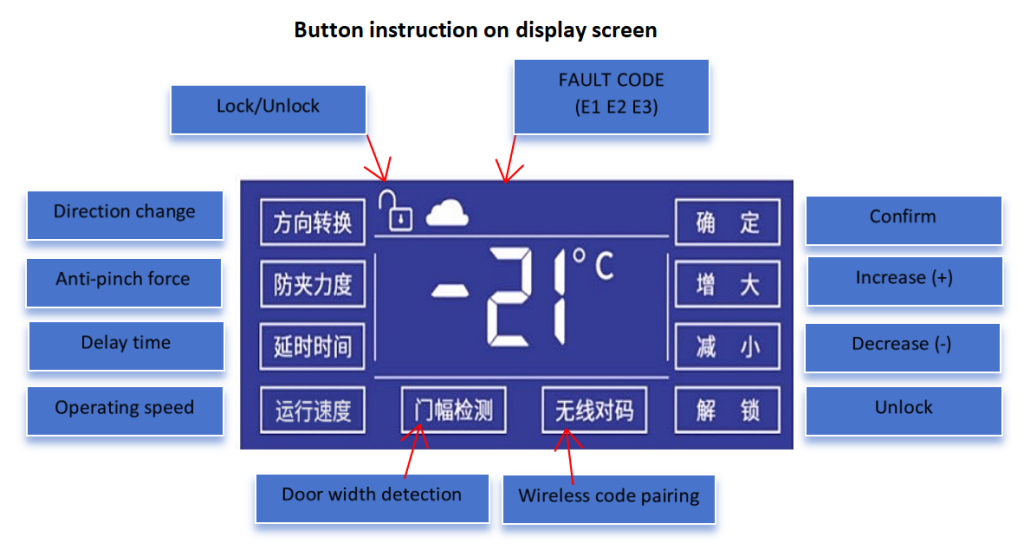
Debugging steps
1,Door Opening and Closing Torque Adjustment(Adjust before door width detection)
1.1. Press “Increase” button and hold for 6 seconds before door width detection, then press “Increase” or “Decrease” button for door opening and closing torque adjustment, have to press “confirm” button for saving.
1.2. If you find door can’t be fully opened or closed, please adjust this parameter.
1.3.The range of this parameter is 1 to 10, the factory default value is 5.
WITHIN 100kg, 3,
100kg to 150, 4,
150kg to 200kg, 5.
2, Automatically measure the width of the door
2.1. Press and hold the “Unlock” button on the LCD screen for 5 seconds to unlock. When the door is in the middle state (half-open, and the door lock must be open), press the “Door Width Detection” button. The button will flash, and the system will start broadcasting (the first movement of the door is a closing action).
2.2. After the door closes completely, it will open again. Wait for the broadcast announcing “Width detection complete” to finish, indicating the detection is done.
(Note: Pressing the “Door Width Detection” button again will clear previous detection data, and the button will flash at this time!)
2.3.After the width of the door measurement is completed, if the direction is opposite to the actual direction, press the “direction change” key. After a beep, the direction change is successful! It can then be put into use!
3, Operating speed of the door adjustment
3.1. Press the “Operation Speed” button, and the LCD screen will display the motor’s running speed (1-10).
3.2. Use the “Increase/Decrease” buttons to adjust to the required speed.
3.3. Press the “Confirm” button to complete the setting.
(Note: The factory default value is 3.)
4, Anti-pinch force adjustment
4.1. Press the “Anti-pinch Force” button, and the LCD screen will display numbers (1-10).
4.2. Use the “Increase/Decrease” buttons to adjust to the required force level.
4.3. Press the “Confirm” button to complete the setting.
(Note: 1-10 represent anti-pinch force levels—the higher the number, the stronger the anti-pinch force. The factory default value is 6.)
5, Delay time setting
5.1. Press the “Delay Time” button to enter the delay time setting (0-10), with the unit being 10 seconds (0 means the default is off, and the geomagnetic switch is not used).
5.2. Use the “Increase” and “Decrease” buttons to adjust to the required delay time, then press the “Confirm” button to save!
(Note: The delay function is only effective when using geomagnetism, and the factory default is 0.)
6, Wireless coding for remote control
6.1. Press the “Wireless Code Pairing” button on the LCD screen. The button will start flashing, and the voice prompt will announce “Code pairing in progress.”
6.2. Immediately press the remote control button until the “Wireless Code Pairing” button stops flashing, indicating the pairing is complete.
7, Delete the code of remote control
Long-press the “Wireless Code Pairing” button on the LCD screen. Wait for the voice prompt “Code cleared” to confirm successful code clearing.
(Note:
1. The factory code pairing is already completed, so users do not need to perform code pairing. Do not press the remote control during the door width measurement process. If the remote control is lost, please contact us.
2. If the remote control becomes inoperative after the door width measurement is completed, power off and restart the controller to restore functionality.)
Explanation of Fault Code:
E1:36V switching power supply fault.
E2:Motor fault
Troubleshooting:
1. Check if the power cord is loose.
2. Inspect whether the Hall signal is short-circuited or loose.
E3:Anti-pinch protection prompt
Troubleshooting:
1. Increase the anti-pinch protection parameter value to enhance the anti-pinch force.
2. Check whether there are obstacles in the track.